Monday, March 18, 2013

Polymeri Online 18.3.13 | Scrap or planned sheet, Inking your findings, Polymer clay tile collage and Millefiori headband

Passover holiday is just around the corner and I find myself doing so many things besides claying. I was also waiting forever for a shipment of materials I plan to use in my new classes and I am also guessing that the overload from my recent traveling demanded some rest. Anyway, now I am back with full powers and there are some exciting surprises ahead.


polymer clay sheet
is it scrap? or a planned design?
Now back to some polymer clay talk -

Look at this beautiful scrap sheet posted in Anne Poncet blog. She describes it as "work in process". Later posts reveal a set of necklace and earrings using this beautiful sheet. The cutter replacing and changing colors makes this sheet a new beginning of a new design. More designs in her blog.
http://lebruitdesvagues.canalblog.com/archives/2012/09/28/25198229.html
https://www.facebook.com/APoncetLeBruitDesVagues

Alcohol inks as the new
 findings painting medium

We all know Alcohol Inks as a material to use on clay, but what about using it on metal findings to color them? Annie Bimur (Anna Kokareva) is using these inks to decorate her findings and the result is wonderful!
http://www.flickr.com/photos/bimur/6904240826/in/photostream
You can link to her blog as well for more polymer clay talk -
http://bimur.livejournal.com/40466.html

The Pikes Peak polymer clay guild made a joint project of all(?) or several members to create a beautiful tile collage project. The members created square tiles to be assembled into a larger piece - a woman face. The photos of the process and final product were published on Facebook and you can see them as well. Julie Eakes was the one behind this idea and Sue Mueller was the picture creator.

polymer clay millefiori headband
It's been one of my projects to make a polymer clay headband. I have some blank metal headbands just waiting to be created and still I never used it.
Purpleluggage (Jen from Philippines) created these delicate beautiful millefiori floral headbands and in her post she is trying to explain to potential buyers why they are more expensive then regular headbands sold out there. As some of us know, this long process of millefiori canning along with forming these delicate petals requires a lot of work and that's the result of a real handmade product!
Lot's of great food, dogs and polymer clay art in her blog -
http://purpleluggage.blogspot.it/2012/07/purpleluggage-floral-headbands.html


Sunday, March 10, 2013

Polymeri Online 10.3.13 | Dancing switch plates, Martha's polymer clay Easter eggs, Lace buttons tutorial and use your drawer mat for...


Diane's Polymer Clay Switch Plates
An artist from Flickr sent me a friend request and I was intrigued. Dmanzi (Diane Manzi) is the artist behind beautiful mosaic pieces - frames, switch plates and jewelry.
She uses a reverse mosaic style and incorporate other canes of clay designs, faces and flowers. Some of them have dancing figures drawn as a stencil first and then cut out of the clay.

Martha Stewart and Liz Smith
Demonstrating an Easter egg project
I have never decorated an egg before so I enjoyed this easy video tutorial which was posted on Martha Stewart website. Liz Smith demonstrated the process of creating a Millefiori Easter egg.
Martha was all excited about this decorating technique but on the same breath said that this takes quite a looong time! :) But she enjoyed every minute as you will see in her video.

Polymer clay buttons tutorial
Viktoria Slutsky posted a super easy and fun tutorial for making lace polymer clay buttons. All you need is paint, lace and a real button to measure the holes!

A new "brother" to Pinterest is craftgawker. This site is a curated photo gallery that allows a visual search and discovery of handmade arts and crafts to inspire your own projects. You can use the search to view all kinds of beautiful photos, inspiration and future projects.

Colored Pencils
And an outside inspiration as Sage bray calls it - These breath taking pieces, posted in "Daily Art Muse" website, belong to an Australian artist - Lionel Bawden which uses hexagonal colored pencils as a sculptural material, forming amazing shapes. I can see some extruder work here if you're looking for  inspiration...

A TIP!
In my last IKEA visit I saw this cool drawer mat and thought it can be super useful as a.... texture sheet!
I tried it and the result was great!
You can purchase a huge roll of this mat and cut it into smaller pieces to use on your clay. It is flexible, non sticky and the texture is nice as well.
You can see the visual effect of this texture on both Sharon and Rose's name tags.
Drawer Mat from IKEA


Tuesday, March 5, 2013

Mini Tutorial - "CFCF2013" Extruded Pixel Cane Free How-To

I know everyone is talking about the upcoming Synergy 3, but since I had enough flying this month, I am staying home in my cozy bed and doing some studio work.

Swap brooches was one of my projects prior to my trip. These brooches were given as gifts to all ~100 participants.
The subject was free so I decided to create a pixel cane with the words "CFCF 2013".
These cane slices were turned into fun brooches, It was so lovely seeing the students wearing them on their name tags.

I thought to myself that this can be a useful mini-tutorial for you guys in case you decide to make a similar project, swap, gifts or even your own name cane made from extruded pixels.
For this project I used the 4 mm square disc to make sure I end up with a rather small cane. Working with the 6 mm disc would cause this cane to be quite big. The final size of the cane was 16 "pixels/squares" X 13 pixels wide which calculates to about 7cm/2.5 inches X 5 cm/2inches face surface area.
The 4 mm square disc is usually included in the Makins Metal clay extruder (sold in Marie Segal's store) and is not sold separately. I included this disc as a freebie when ordering my complete "Extrudinary" tutorial kit.

~~~~~~~~~~~~~~~~~~~~~~~~~~~~~~~
I started my planning with an empty diagram of squares.
The next step was to place the letters in the most efficient way.
What do I mean by efficient?
I want the letter to be clear, visible but as small as possible to make sure the final cane isn't huge.
I used a neat tool called "Cross Stitch Writing Tool" to create my letters as a bench mark for the cane.
Cane Diagram - Click to enlarge
Then, copied it into the diagram.

The next step was to plan the background; plan the spaces and to count the pixels - letters and background apart. Each square is considered a "pixel".

The total "pixels" for the word CFCF was 32 pieces/parts, while the background around it was 84 parts.
The number 2013 was a total of 32 parts and background was 80 parts.

Next step was to determine the size/length of each "pixel" or in another words, what would be the height/length of the final cane before reduction.
In my case I wanted ~100 slices so I went for 7 cm / ~2.5 inches length of a cane (before reduction).

CFCF cane - back side
Click to enlarge
Now - Get busy extruding!....

When all colors are extruded, including some retro canes, I started the assembling of the pixel cane.
Placing each pixel, one by one, one next to the other to form a row (following the diagram) and going to the next row placing the pixels on top of the previous one. This step is crucial for the final look of the cane. If you place one of the parts offset a bit, the cane will look "distorted".

When working with such thin squares, a more stiffer clay is recommended. If you work with a very soft clay the squares will get stretched when you place them onto the cane.
CFCF cane - Front side
Click to enlarge

I played with the colors of my cane (black and white for the "CFCF" and black and red for the "2013") but you can make a unified cane in the same colors.

The red clay was a little softer then the white one so the final slices are a little diagonal in the joint. I'll keep this in mind for next time ;)
When the cane was ready, I reduced it slowly, measured it's size and divided into 100 slices & cut accordingly.

That's it!
Looks easy - right?
20+ diagrams which are included
in the Extrudinary Tutorial
You can make million designs using this method, even transform the most complex painting into pixels and transfer it into "squares".

Have fun!
I'll be happy to see your "pixel" canes!


Thursday, February 28, 2013

Back from Cabin Fever Clay Festival 2013 - USA Trip

Name Tags I made for all my students
and I am back!
Cabin Fever Clay Festival 2013 is over, It was a wonderful gathering of ~80 great polymer clay minds, all together happy and smiling (polymer fumes?! ;) creating unforgettable moments.

Once again I feel that there is something magical about people sitting together, talking with such enthusiasm about their polymer clay joy, 24/7, chatting about what makes them happy and color their world, even for an hour or two a week. You don't have to be a pro to enjoy such an event.
I had the pleasure of meeting so many new people, from all over US and beyond, introducing them to my own personal polymer clay world.
My dear students did a wonderful job creating their little master pieces, enjoying their time learning a trick or two, and teaching me some of their own too!
5 Full days. I had so much fun.

Fireman on alert!
And some funny moments - Apparently some one lit a candle inside one of the rooms and the whole hotel was evacuated outside, waiting for the Fire department to come and check it out (guess where I was when the bell rang? Yes, in the shower ;)
Traveling all the way to Polymer Clay Express with Mira Pinki Krispil and Jana Roberts Benzon, what a fun drive we had;
Shopping with Linda Hess in "Michaels", "Hobby Lobby" and where not! How can we can't miss these when we're here!
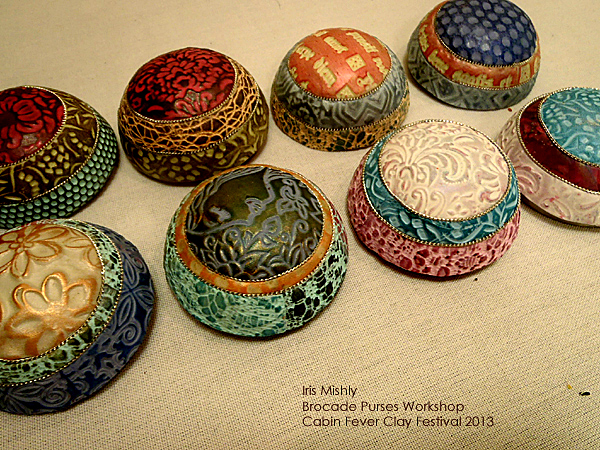
Staedtler North America donated all the materials used in my Skyscraper and Brocade Purses classes - That was such an amazing gift! Thank you!

Polymer Clay Express
And Finally, few more days in NYC with Pinki for re-stocking and breathing cold (real cold!) air just before we take our plane back.

So thank you Kathryn Ottman for this wonderful event that ticks like a clock, perfectly every time! Seeing Christian in person was one of the highlights moments! :)
Thank you all my students who chose to "Skyscrap'in" and "Brocad'in" with me - I had a great time with you!
Thank you all the teachers who made this event even more colorful - especially the dear Marie Segal, Jana Benzon Roberts, Sarah Shriver and Christi Friesen, I had fun chatting with you!

Thank you Staedtler for your generous donation!
Next on my map is Liechtenstein workshops with Melanie Muir and Sabine Backer. Cannot wait.

I will be resting for a day or two, getting my studio back in order and hours back to regular and post a new PolymeriOnline soon, meanwhile you can peek into some of the photos taken by myself using my IPAD (Arrrr! that camera is awful) and more on my Facebook.
Take care!


Skyscraper Pendant 
Skyscraper Beads

Skyscraper Beads

Skyscraper Beads


Skyscraper Beads


Brocade Purses Class 
Staedtler Clay Donation


Brocade Purses Class 

Skyscraper Beads


Skyscraper Beads


Monday, February 11, 2013

Polymer Clay Angry Birds - FREE How-To Video

Who doesn't like angry birds?
I just LOVE them :)

About 2 months ago I had a "special order" from my nieces to create small angry birds earrings.
I went straight to work and left the camera on while working (don't worry, I don't work so fast, the video is 300% faster then the original...;)
So just before I start packing my suitcases and fly to Maryland, here is a quick and easy tutorial for red angry birds and green pigs.
These were snatched up before I even got a change to take their final photo!

B.T.W - Did you know that "Rovio" people, who invented angry birds, are from Finland?
I didn't know that.
After emailing them and asking for their approval I noticed it!

Have fun!

Sunday, February 10, 2013

Polymeri Online 10.2.13 | Tectonic bangles, Filigree patience, Polymer "Valen-Tins", Domed heart pendants and Illuminated smiley purses

Techtonic Polymer Clay
Have you seen Izabela Nowak's latest Tectonic bangles? I was open mouthed! So unique! Izabela is always keeping us intrigued by her beautiful designs and ooak innovations. Don't miss her "tectonic" pendants as well, it's "Earth-Quaking"...

Filigree Polymer Clay Tutorial

Marusic said she promised a master class on making filigree and she is keeping her promises (yay!) tedious - yes, time consuming - yes, but not difficult. All you'll need for this project is clay in two colors, liquid clay, cutting tool (knife, blade, etc.), toothpicks, needle and metal powders (and lot's of spare time!)
Another similar design of this delicate, tiny art form was posted in Sage Bray's blog featuring Olga Shukova. Admirable.

"Valen-Tins"

MaryAnne posted lovely tin covers especially for Valentines, she calls it "Valen-tins" :) Playing with textures and colors is common in her flickr gallery, Jewelry, journals, beads. don't miss her beautiful looking bracelet
and bangles.


Valentine's Heart Pendant Tutorial

Here is a fun tutorial by Becky from "PoshPinkGiraffe" for heart pendants for Valentines, using the Mod Podge Dimensional Magic to create a domed effect. This material is definitely worth checking, I'll have to look for it when I am in USA next week.
http://poshpinkgiraffe.blogspot.co.il/2013/02/sweet-heart-polymer-clay-jewelry.html


4 days to my trip and I am finalizing my preparations with one final experiment, a glowing smiley purse (without glow in the dark clay) using translucent clays and tiny illumination. These can be so cool as atmosphere lights, hanging around the house, in case of loss of power (Beware Nemo Blizzard!) or even as Christmas tree ornaments!
Keep your fingers crossed for me that Nemo won't come back....
I am not sure posting in my blog will be possible while I am traveling, so you are welcome to follow me on FaceBook.
See you in another continent!

Polymer clay purses - Brocade Collection - Illuminated

Polymer clay purses - Brocade Collection - Illuminated

Sunday, February 3, 2013

Polymeri Online 3.2.13 | PatchWork polymer tutorial, Clay flowers, Birdie meets her real sister, Anything is possible magnet and my new Long Neck Karen necklaces

Polymer Clay PatchWork Tutorial
My dear friend klavdija posted a wonderful pictorial for her patchwork jewelry. This is a beautiful technique which will tickle your fingers to go ahead and try it. I know I will!
Thank you dear friend!
While you are looking at her delights, jump in her Facebook page for more goodies -
http://www.flickr.com/photos/klavdija-s_corner/sets/72157632511296156/with/8375335389/

Clay flowers
Natasha can not imagine her life without creativity and search (can't agree more). Her artistic love is devoted to flowers and stones, their incredible colors, shades and textures.
Her clay flowers are made of Japanese polymer clay which I think called Deco clay. Barrettes, rings and jewelry - looks so real, you can hardly believe it's clay.
www.etsy.com/shop/SilverSeagullArt

Polymer birdie meet her real sister
Mina Creations - Chieko Sasaki, living in Tokyo Japan, works with glass and well as polymer clay - miniatures, canes and sculpturing. I stumbled across her little birds photo on Facebook, polymer bird meets a real one - or is it the other way around? Anyway, she says she is glad that her real bird appreciates art and welcomed the new friend. :)
https://www.facebook.com/chitoMINA
http://minacreations.mo-blog.jp/

Anything is possible magnets
Joy Magnet Art is all dedicated to message magnets, each is like a miniature "collage in clay". Pieces of clay are torn into "fragments", and impressed with stamps and other objects for interesting designs. Most pieces have several layers of clay, with various inspirational words and positive sayings. Anything Is Possible :)
www.etsy.com/shop/JoyMagnetArt


Remember these?
Well, they turn into these.
After using metal rings between the beads, they look more like the Long Neck Karen women, don't you think?
I am almost ready for my trip next week.

Polymer clay beads | LifeSavers Necklace

Polymer clay beads | LifeSavers Necklace

Polymer clay beads | LifeSavers Necklace

Polymer clay beads | LifeSavers Necklace

Polymer clay beads | LifeSavers Necklace