Tuesday, March 26, 2013

Polymeri Online 26.3.13 | Butterflies cluster, Polymer clay knitted masks, Beautiful scrap jewelry and Fusion design team

Gloria's Butterflies Cluster
While looking at the ACC 2013 show presenters list, which took place in Atlanta at the same time with Synergy conference, I stumbled upon a polymer clay artist name that was new to me (and I think I 
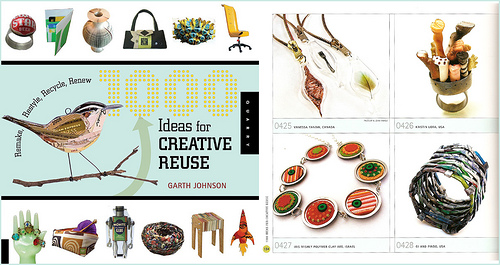
know most of them), Gloria Danvers. The piece shown as a thumbnail next to her name was a lovely butterflies canes necklace. According to her she is using link chains to form a bib, and then cover it with butterfly wings. It is her interpretation of the way butterflies clustering on trees during migration.
I have been in the ACC show several times before, when Synergy took place in Baltimore and it is a must show for every artist in any medium.


Sari's polymer clay masks
Sari Lin from Israel is a long time friend and polymer clay colleague. I had the pleasure of being her teacher for several technique classes and we continued our polymer clay friendship through the internet and on Facebook. In her recent creations she is playing with faux knitting to create polymer clay masks. Here is another version of masks in a different color/technique.
Sari is mad about pens which are always on demand among her friends, family and customers and loves to play with different techniques. Even though she is dealing with multiple sclerosis for many years, she is choosing the more colorful side of life and found polymer clay to be her best chosen medium. One of her recent creations is a LaserCut bracelet after taking Jana Benzon's workshop recently given in Israel.


Tanya's Jewelry

Tanya Mayorova is from Russia is only 25 years old. Her flickr gallery is full of goodies, I had a difficult time choosing which picture to show next to her name. She is working with polymer clay and scrap booking, plan to start to learn to draw. Her techniques are mixed - millefiori, beautiful use of scrap and more.


Fusion in Polymer

One of Tanya's favorites on Flickr is vix @fusion, mother (jean) and daughter (vix) fusion team playing with materials and techniques. In this photo they are presenting polymer clay rings on twisted copper wire bracelet. Fusion jewelry designs are handcrafted and created from various craft mediums such as polymer clay, semi precious gemstones, wire and kumihimo braiding techniques.

It's passover holiday in Israel right until next week, family time and resting, always a pleasure.
Have a great week!

Monday, March 18, 2013

Polymeri Online 18.3.13 | Scrap or planned sheet, Inking your findings, Polymer clay tile collage and Millefiori headband

Passover holiday is just around the corner and I find myself doing so many things besides claying. I was also waiting forever for a shipment of materials I plan to use in my new classes and I am also guessing that the overload from my recent traveling demanded some rest. Anyway, now I am back with full powers and there are some exciting surprises ahead.


polymer clay sheet
is it scrap? or a planned design?
Now back to some polymer clay talk -

Look at this beautiful scrap sheet posted in Anne Poncet blog. She describes it as "work in process". Later posts reveal a set of necklace and earrings using this beautiful sheet. The cutter replacing and changing colors makes this sheet a new beginning of a new design. More designs in her blog.
http://lebruitdesvagues.canalblog.com/archives/2012/09/28/25198229.html
https://www.facebook.com/APoncetLeBruitDesVagues

Alcohol inks as the new
 findings painting medium

We all know Alcohol Inks as a material to use on clay, but what about using it on metal findings to color them? Annie Bimur (Anna Kokareva) is using these inks to decorate her findings and the result is wonderful!
http://www.flickr.com/photos/bimur/6904240826/in/photostream
You can link to her blog as well for more polymer clay talk -
http://bimur.livejournal.com/40466.html

The Pikes Peak polymer clay guild made a joint project of all(?) or several members to create a beautiful tile collage project. The members created square tiles to be assembled into a larger piece - a woman face. The photos of the process and final product were published on Facebook and you can see them as well. Julie Eakes was the one behind this idea and Sue Mueller was the picture creator.

polymer clay millefiori headband
It's been one of my projects to make a polymer clay headband. I have some blank metal headbands just waiting to be created and still I never used it.
Purpleluggage (Jen from Philippines) created these delicate beautiful millefiori floral headbands and in her post she is trying to explain to potential buyers why they are more expensive then regular headbands sold out there. As some of us know, this long process of millefiori canning along with forming these delicate petals requires a lot of work and that's the result of a real handmade product!
Lot's of great food, dogs and polymer clay art in her blog -
http://purpleluggage.blogspot.it/2012/07/purpleluggage-floral-headbands.html


Sunday, March 10, 2013

Polymeri Online 10.3.13 | Dancing switch plates, Martha's polymer clay Easter eggs, Lace buttons tutorial and use your drawer mat for...


Diane's Polymer Clay Switch Plates
An artist from Flickr sent me a friend request and I was intrigued. Dmanzi (Diane Manzi) is the artist behind beautiful mosaic pieces - frames, switch plates and jewelry.
She uses a reverse mosaic style and incorporate other canes of clay designs, faces and flowers. Some of them have dancing figures drawn as a stencil first and then cut out of the clay.

Martha Stewart and Liz Smith
Demonstrating an Easter egg project
I have never decorated an egg before so I enjoyed this easy video tutorial which was posted on Martha Stewart website. Liz Smith demonstrated the process of creating a Millefiori Easter egg.
Martha was all excited about this decorating technique but on the same breath said that this takes quite a looong time! :) But she enjoyed every minute as you will see in her video.

Polymer clay buttons tutorial
Viktoria Slutsky posted a super easy and fun tutorial for making lace polymer clay buttons. All you need is paint, lace and a real button to measure the holes!

A new "brother" to Pinterest is craftgawker. This site is a curated photo gallery that allows a visual search and discovery of handmade arts and crafts to inspire your own projects. You can use the search to view all kinds of beautiful photos, inspiration and future projects.

Colored Pencils
And an outside inspiration as Sage bray calls it - These breath taking pieces, posted in "Daily Art Muse" website, belong to an Australian artist - Lionel Bawden which uses hexagonal colored pencils as a sculptural material, forming amazing shapes. I can see some extruder work here if you're looking for  inspiration...

A TIP!
In my last IKEA visit I saw this cool drawer mat and thought it can be super useful as a.... texture sheet!
I tried it and the result was great!
You can purchase a huge roll of this mat and cut it into smaller pieces to use on your clay. It is flexible, non sticky and the texture is nice as well.
You can see the visual effect of this texture on both Sharon and Rose's name tags.
Drawer Mat from IKEA


Tuesday, March 5, 2013

Mini Tutorial - "CFCF2013" Extruded Pixel Cane Free How-To

I know everyone is talking about the upcoming Synergy 3, but since I had enough flying this month, I am staying home in my cozy bed and doing some studio work.

Swap brooches was one of my projects prior to my trip. These brooches were given as gifts to all ~100 participants.
The subject was free so I decided to create a pixel cane with the words "CFCF 2013".
These cane slices were turned into fun brooches, It was so lovely seeing the students wearing them on their name tags.

I thought to myself that this can be a useful mini-tutorial for you guys in case you decide to make a similar project, swap, gifts or even your own name cane made from extruded pixels.
For this project I used the 4 mm square disc to make sure I end up with a rather small cane. Working with the 6 mm disc would cause this cane to be quite big. The final size of the cane was 16 "pixels/squares" X 13 pixels wide which calculates to about 7cm/2.5 inches X 5 cm/2inches face surface area.
The 4 mm square disc is usually included in the Makins Metal clay extruder (sold in Marie Segal's store) and is not sold separately. I included this disc as a freebie when ordering my complete "Extrudinary" tutorial kit.

~~~~~~~~~~~~~~~~~~~~~~~~~~~~~~~
I started my planning with an empty diagram of squares.
The next step was to place the letters in the most efficient way.
What do I mean by efficient?
I want the letter to be clear, visible but as small as possible to make sure the final cane isn't huge.
I used a neat tool called "Cross Stitch Writing Tool" to create my letters as a bench mark for the cane.
Cane Diagram - Click to enlarge
Then, copied it into the diagram.

The next step was to plan the background; plan the spaces and to count the pixels - letters and background apart. Each square is considered a "pixel".

The total "pixels" for the word CFCF was 32 pieces/parts, while the background around it was 84 parts.
The number 2013 was a total of 32 parts and background was 80 parts.

Next step was to determine the size/length of each "pixel" or in another words, what would be the height/length of the final cane before reduction.
In my case I wanted ~100 slices so I went for 7 cm / ~2.5 inches length of a cane (before reduction).

CFCF cane - back side
Click to enlarge
Now - Get busy extruding!....

When all colors are extruded, including some retro canes, I started the assembling of the pixel cane.
Placing each pixel, one by one, one next to the other to form a row (following the diagram) and going to the next row placing the pixels on top of the previous one. This step is crucial for the final look of the cane. If you place one of the parts offset a bit, the cane will look "distorted".

When working with such thin squares, a more stiffer clay is recommended. If you work with a very soft clay the squares will get stretched when you place them onto the cane.
CFCF cane - Front side
Click to enlarge

I played with the colors of my cane (black and white for the "CFCF" and black and red for the "2013") but you can make a unified cane in the same colors.

The red clay was a little softer then the white one so the final slices are a little diagonal in the joint. I'll keep this in mind for next time ;)
When the cane was ready, I reduced it slowly, measured it's size and divided into 100 slices & cut accordingly.

That's it!
Looks easy - right?
20+ diagrams which are included
in the Extrudinary Tutorial
You can make million designs using this method, even transform the most complex painting into pixels and transfer it into "squares".

Have fun!
I'll be happy to see your "pixel" canes!